FDDA - Modelling a network
You start modelling by creating a new project, either through the menu
or the tool bar. Next, you should select the algorithm you'd like to
demonstrate. You can do this by selecting "Demonstration >
Algorithm...". Then, you can add nodes and connections.
You add nodes by selecting the node tool (the one with the circle). As
with the other tools, it stays selected after you add the new node if
you press the <shift> key while selecting it. Then click into
the project window wher you want your new node. You add connections - either
directed or undirected - by selecting the tool and dragging a line
from one node to the other. With the erazor tool, you may delete nodes
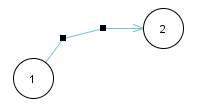
or connections. You can add intermediate points on a line by holding
<shift> and dragging on the line or by double clicking on the
line. You can move these points to change the shape of the line. They
look like this:
If you have the grid enabled (through 'View > Show grid') all nodes
and points are automatically moved so they are centered on grid
points. This makes it easy to align them vertically or
horizontally. You can change the width of the grid in the options
dialog ('Edit > Options). The grid isn't shown on exported JPEG
files.
You select nodes, connections or points by clicking on them. You can
select several at the same time by pressing the <ctrl> key or by
drawing a selection rectangle with the mouse. If a connection or a
node is selected, you can change their properties using the window on
the right side of the application.
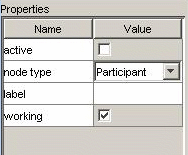
Nodes always have
at least four properties (they can have more if you added some
programmatically). The first one is called 'active' and determines
whether the method start() of the node shall be called
once the demonstration begins. All algorithms should have at least one
node which is active. The method is also called if a node that wasn't
working gets 'repaired' while the demo is running, BTW.
The second property determines the type of the node. There are two
fixed types always available apart from those you've programmed. These
are:
- Passive nodes: These don't do anything. All their methods
are empty. This is the standard node type.
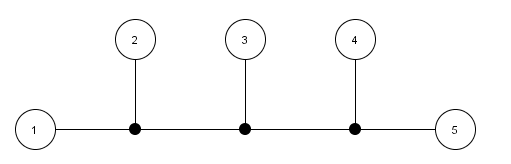
- Repeaters: These are shown differently in the project
window, as small black circles. They don't act on their own, but they
forward each incoming message to all their other neighbours. They
don't count for the statistics, and you may use them e.g. to model a
bus structure, as in the image below.
The third property of a node is its label. This is what is shown
inside the node, so it shouldn't be longer than a few characters. An
ID is probably best.
The last property determines whether the node is working. The methods
of nodes that are not working are not called by the framework. They
are crossed out in the project window.
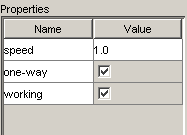
Connections have
three properties (always). One determines whether the connection is
directed; directed connections can only transport messages in the
direction they point. Another determines whether the connection is
working; this is similar to nodes. Only working connections transport
messages. The last property determines the speed of the connection,
i.e. how fast messages are transported by it. 1.0 is the normal speed,
while 2.0 would be twice as fast, 0.5 would be half as fast,
etc. Important: the length of the connection determines how long a
message will take; in other words, all messages have the same speed if
their connections have the same speed.
While the demonstration of an algorithm is running, most modelling
functions are disabled. You can't add or remove nodes or connections,
you can't even move them (since that changes the length of the
connections). One thing you can do, though, is changing the
'working' property of nodes or connections and see how your alogrithm
reacts to failures.


